Hexo | 初体验之建立个人博客
Hexo建立个人博客
准备工作
- 安装Git
- 安装Node
- 新建github仓库 仓库名为username.github.io
- 安装hexo 及初始化
Hexo Command
1 | npm install -g #安装Hexo |
新建post
按如下命令:
1 | hexo new (post name) |
推送网站

关联Hexo和Github
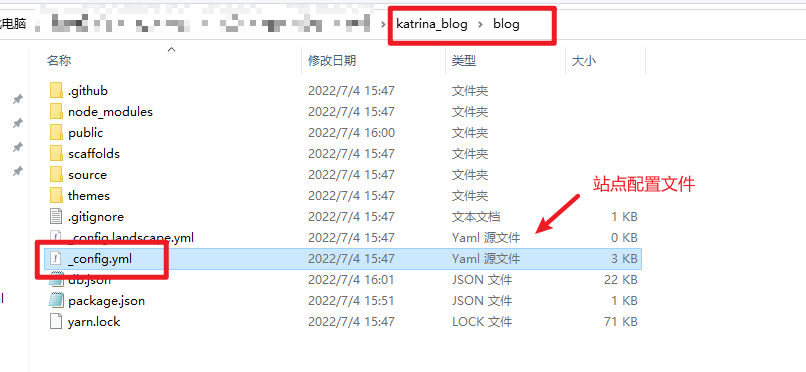
在blog/_config.yml中作如下修改:

保存站点配置文件
意思是给hexo deploy这个命令做相应的配置,让hexo知道你要把blog部署在哪个位置,显然,要部署在github仓库中
1 | npm install hexo-deployer-git --save |
继续输入以下命令:
1 | hexo clean |
然后在网址栏输入:XXX.github.io 就可以在线上访问个人博客了!
绑定域名
没买 直接跳过!
主题配置
https://hexo.io/zh-cn/docs/themes
秉承简约风格,我选择了Next主题
下载主题
1 | git clone https://github.com/next-theme/hexo-theme-next themes/next |
可以看到theme文件夹里面已经有next文件夹了
相关配置
打开site的配置文件(blog/_config.yml),把theme改为next

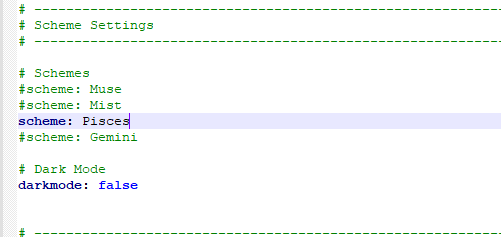
NexT主题有四个样式可以选择配置:(next/_config.yml)

本地查看
1 | hexo clean |
远程配置
1 | npm install hexo-deployer-git --save |
发布文章
文章主要用markdown编写,放置在/blog/source/_posts文件夹下
预览文章
自带Markdown编辑器或者本地hexo预览
个性化设置
站点配置

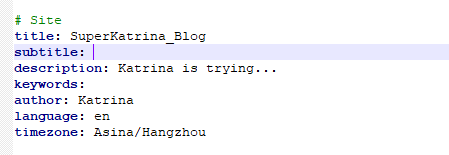
标题、副标题、描述、关键词、语言、时区
主题配置
https://theme-next.js.org/docs/theme-settings/
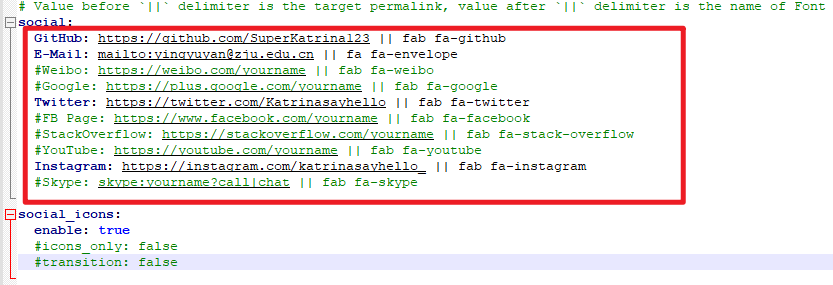
设置社交账号

侧边栏配置
把想要的开启即可

文档中有提及:除了Home和archives,其他的页面都需要自己配置,配置流程看
- Step1:Adding new pages
1 | npm install hexo-deployer-git --save |
- Step2: Setting page type
1 | --- |
- 如果是tag和categoty的话,需要在文章里面配置就会显示到页面上
踩坑&&问题记录
1. github 和 hexo关联没有关联上
原因1:注意仓库大小写问题

原因2:配置url

注意这里一定要根据你的仓库来,因为我是直接配置在仓库里的,而我之前手贱错吧SuperKatrina_Blog当成了project name,所以后面样式失效了,控制台查看原因后发现是路径的问题

2. 配置主题后本地生效 但是 站点一直没生效
解决方法:清除缓存法
依次输入下列命令行
1
2
3hexo clean
hexo g
hexo d
3. 图片显示问题
站点_config.yml中,post_asset_folder设置为true,目的是为了新建文章时自动帮我们建一个与文章名相同的文件夹用来从放图片文件
1
post_asset_folder: true
安装hexo-asset-image
1
npm install hexo-asset-image --save
打开/node_modules/hexo-asset-image/index.js,内容替换为如下:
1
2
3
4
5
6
7
8
9
10
11
12
13
14
15
16
17
18
19
20
21
22
23
24
25
26
27
28
29
30
31
32
33
34
35
36
37
38
39
40
41
42
43
44
45
46
47
48
49
50
51
52
53
54
55
56
57
58
59
60
61;
var cheerio = require('cheerio');
// http://stackoverflow.com/questions/14480345/how-to-get-the-nth-occurrence-in-a-string
function getPosition(str, m, i) {
return str.split(m, i).join(m).length;
}
var version = String(hexo.version).split('.');
hexo.extend.filter.register('after_post_render', function(data){
var config = hexo.config;
if(config.post_asset_folder){
var link = data.permalink;
if(version.length > 0 && Number(version[0]) == 3)
var beginPos = getPosition(link, '/', 1) + 1;
else
var beginPos = getPosition(link, '/', 3) + 1;
// In hexo 3.1.1, the permalink of "about" page is like ".../about/index.html".
var endPos = link.lastIndexOf('/') + 1;
link = link.substring(beginPos, endPos);
var toprocess = ['excerpt', 'more', 'content'];
for(var i = 0; i < toprocess.length; i++){
var key = toprocess[i];
var $ = cheerio.load(data[key], {
ignoreWhitespace: false,
xmlMode: false,
lowerCaseTags: false,
decodeEntities: false
});
$('img').each(function(){
if ($(this).attr('src')){
// For windows style path, we replace '\' to '/'.
var src = $(this).attr('src').replace('\\', '/');
if(!/http[s]*.*|\/\/.*/.test(src) &&
!/^\s*\//.test(src)) {
// For "about" page, the first part of "src" can't be removed.
// In addition, to support multi-level local directory.
var linkArray = link.split('/').filter(function(elem){
return elem != '';
});
var srcArray = src.split('/').filter(function(elem){
return elem != '' && elem != '.';
});
if(srcArray.length > 1)
srcArray.shift();
src = srcArray.join('/');
$(this).attr('src', config.root + link + src);
console.info&&console.info("update link as:-->"+config.root + link + src);
}
}else{
console.info&&console.info("no src attr, skipped...");
console.info&&console.info($(this));
}
});
data[key] = $.html();
}
}
});图片按照如下格式引入
1
{% asset_img example.jpg This is an example image %}
插件
字数统计
根据步骤来
https://github.com/next-theme/hexo-word-counter
注意(踩坑!!!):配置完成后必须hexo clean,否则会出现时间为NaN 的情况!
版权声明_hexo-addlink
安装后在站点配置文件中配置
1 | # 版权信息 |
参考
https://zhuanlan.zhihu.com/p/26625249(GitHub+Hexo 搭建个人网站详细教程)
https://hexo.io/zh-cn/ (Hexo中文文档)
https://theme-next.js.org/docs/theme-settings/ (主题配置)
https://theme-next.js.org/(NexT主题文档)