0%

flex(flexible box)布局意为弹性布局,用来为盒装模型提供最大的灵活性

flex布局通过display:flex进行调用,任何一个容器,即使是行内元素,都可以调用flex布局

注意:设置为flex布局后,子元素的float clear vertical-align属性将失效

基本概念

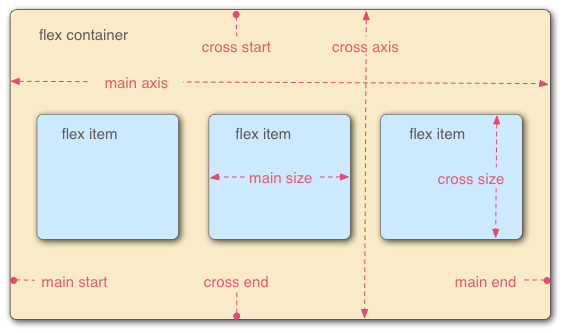
  1. 采用flex布局由两种元素构成:

    • 容器:flex container

    • 项目:flex item

  2. 容器默认有两根轴:

    • 主轴:main axis【默认水平】
    • 交叉轴:cross axis
  3. 位置设定:

    • 主轴开始位置:main start
    • 主轴结束位置:main end
    • 副轴开始位置:cross start
    • 副轴结束位置:cross end
  4. 项目排列:

    • 项目默认按照主轴进行排序
    • main size:单个项目占据的主轴空间
    • cross size:单个项目占据的交叉轴空间

容器属性

flex-direction 决定主轴的方向 => 主轴的方向决定着项目的排布方向

  • row(默认值):主轴为水平方向,起点在左端
  • row-reverse:主轴为水平方向,起点在右端
  • column:主轴为垂直方向,起点在上沿
  • column-reverse :主轴为垂直方向,起点在下沿

flex-warp 定义如果一条轴线排不下,如何换行

  • nowarp(默认):不换行 【会压缩项目的宽度】
  • wrap:换行,第一行在上方
  • wrap-reverse:不换行,第一行在下方

flex-flow flex-direction 和 flex-warp的简写

justify-content 定义项目在主轴上的对齐方式

  • flex-start(默认值):左对齐
  • flex-end:右对齐
  • center:居中
  • space-between:两端对齐,项目之间间隔相等
  • space-around:每个项目两侧间隔相等,项目之间的间隔比项目与边框的间隔大一倍

align-items 定义项目在交叉轴上如何对齐

  • flex-start:交叉轴起点对齐
  • flex-end:交叉轴终点对齐
  • center:交叉轴中点对齐
  • baseline:项目第一行文字的基线对齐
  • stretch(默认值):如果项目未设置高度或者auto,将占满整个容器的高度

align-content 定义多根轴线的对齐方式 如果项目只有一根轴线 则不起作用

  • flex-start:与交叉轴的起点对齐。
  • flex-end:与交叉轴的终点对齐。
  • center:与交叉轴的中点对齐。
  • space-between:与交叉轴两端对齐,轴线之间的间隔平均分布。
  • space-around:每根轴线两侧的间隔都相等。所以,轴线之间的间隔比轴线与边框的间隔大一倍。
  • stretch(默认值):轴线占满整个交叉轴

项目属性

order 定义项目的排列顺序

数值越小,排列越靠前,默认为0

flex-grow 定义项目的方法比例

默认为0,即如果存在剩余空间,也不放大

如果所有项目的flex-grow属性都是1,则将它们等分剩余空间

如果有一个项目的flex-grow属性都是2,其余都为1,则前者占据的空间比其他项多一倍

flex-shrink 定义项目的缩小比例

默认为1,即如果空间不足,则将该项目缩小

如果所有项目的flex-shrink属性都为1,当空间不足时,都将等比例缩小

如果一个项目的flex-shrink属性都为0,其余项目都为1,则空间不足,前者不缩小

flex-basis 定义了在分配多余空间之前,项目占据的主轴空间(main size)

默认值为auto,即原本的大小

可以设为跟widthheight属性一样的值(比如350px),则项目将占据固定空间

flex flex-grow, flex-shrinkflex-basis的简写

默认值为0 1 auto

该属性有两个快捷值:auto (1 1 auto) 和 none (0 0 auto)

align-self 允许单个项目有与其他项目不一样的对齐方式,可覆盖align-items属性

默认值为auto,表示继承父元素的align-items属性,如果没有父元素,则等同于stretch

  • auto
  • flex-start
  • flex-end
  • center
  • baseline
  • stretch

参考

Flex布局

react-router的工作方式

顶层是一个Router组件,在组件树中散落着许多Route组件

顶层的Router组件负责分析监听URL的变化,在此之下Route组件可以直接读取这些信息

1
2
3
4
5
6
7
8
9
10
11
// index.js
import React from 'react';
import ReactDOM from 'react-dom';
import { HashRouter } from 'react-router-dom';
import './index.css';
import App from './App';

ReactDOM.render((
/*HashRouter监听着App这个组件的url的变化*/
<HashRouter><App /></HashRouter>
), document.getElementById('root'));

路由需要实现的三个功能:

  1. 当浏览器地址变化时,切换页面;
  2. 点击浏览器后退、前进按钮,网页内容发送变化;
  3. 刷新浏览器,页面加载内容对应当前路由对应的地址;

在单页面web网页中,单纯的浏览器地址改变,网页不会重载,如单纯的hash值改变,网页是不会变化的,因此我们的路由需要监听事件,并利用js实现动态改变网页

  • hash模式(onhashchange):监听浏览器地址hash值变化,并执行相应的js切换【前进后退等】
  • history模式(popstate):利用H5 history API实现url地址改变,网页内容改变

BrowserRouter和HashRouter的区别和特点

BrowserRouter

window.history对象表示的是当前窗口得浏览历史,当发生改变时,只会改变路径,不会刷新页面

History对象就是一个堆栈

方法:

  • History.back:移动上一个网址,等同于浏览器的后退
  • History.forward:移动到下一个网址,等同于浏览器前进
  • History.go(n):接受一个参数,以当前网页为基准,来进行跳转,默认history.go(0),刷新当前页面
  • History.pushState():往history堆栈中添加一条记录,不会刷新页面,只会导致history对象变化,地址栏发生变化
  • History.replaceState():替换当前history堆栈中最上层的记录,不会刷新页面,只会导致history对象变化,地址栏发生变化

每当history对象发生变化,就会触发popstate事件:window.addEventListener(‘popstate’, function(){});

[只调用pushState或者replaceState是不会触发该事件的,只有调用back forward go才会触发该事件]

HashRouter

使用window.location.hash属性和window.onhashchange事件,可以监听浏览器hash值的变化,去执行相应的js切换路由

hash路由实现原理:

  1. hash指的是地址#号以及后面的字符,称为散列值
  2. 散列值不会随着请求发送到服务端的,所以改变hash,不会重新加载页面
  3. 监听onhashchange事件,hash改变时,可以通过window.location.hash来获取和设置hash值
  4. location.hash值得变化直接反应在浏览器得地址栏

总结

底层原理不一样

  • BrowserRouter:利用HTML5 history的API,有低版本兼容性问题
  • HashRouter:利用URL的哈希值,window.location.hash

地址栏表现形式不一样

  • BrowserRouter路径:localhost:3000/demo/a
  • HashRouter路径:localhost:3000/#/demo/a

刷新后对路由state参数的影响

  • BrowserRouter没有任何影响,因为state保存在history对象中
  • HashRouter刷新后会导致路由state参数丢失

理解react-router

单页面应用(SPA single page application)

单页面应用是指只有一张Web页面的应用,是一种从Web服务器加载的富客户端,单页面跳转仅刷新局部资源,公共资源(js css等)仅需加载一次,常用于PC端应用、购物等网站

react-router-dom react-router history库三者关系

history可以理解为react-router的核心,也就是整个路由的核心,里面集成了popState history.pushState等底层路由实现的原理方法

react-router可以理解为是react-router-dom的核心,里面封装了Router Route Switch等核心组件,实现了从路由的改变到组件的更新的核心功能

一般在项目中只需要引入react-router-dom即可

单页面实现核心原理

history模式原理

改变路由

  • history.pushState
1
history.pushState(state, title, path);
  1. state:一个与指定网址相关的状态对象,popState事件触发,该对象会传入回调函数,如果不需要可以填null
  2. title:新页面的标题,但是所有浏览器目前都忽略这个值,可填null
  3. path:新的网址,必须与当前页面处在同一个域,浏览器的地址栏将显示这个地址
  • history.replaceState
1
history.replaceState()

参数同上,这个方法会修改当前的history记录,history.length的长度不会改变

监听路由

  • popstate
1
2
3
window.addEventListener('popstate', function(e){
/*监听改变*/
})

popstate事件只会在浏览器某些行为下触发,比如点击后退按钮(或者在JS中调用history.back()方法),即在同一文档的history对象出现变化会触发该事件

history.pushState()或者history.replaceState()不会触发popstate事件

hash模式原理

改变路由

  • window.location.hash
1
window.location.hash

通过 window.location.hash属性获取hash值和设置hash值

监听路由

  • onhashchange
1
2
3
window.addEventListener('hashchange', function(e) {
/*监听改变*/
});

history库

react-router路由离不开history库,history专注于记录路由的history状态,以及path改变了我们应该做些什么?在history模式下用popstate监听路由变化,在hash模式下用hashchange监听路由变化

createBrowserHistory

Browser模式下路由的运行,一切都从 createBrowserHistory开始

1
2
3
4
5
6
7
8
9
10
11
12
13
14
15
16
17
18
19
20
21
22
23
24
25
26
27
28
29
30
31
32
33
34
35
36
37
38
39
40
41
42
43
44
45
46
47
48
49
50
51
52
53
54
55
56
57
58
59
60
61
62
63
64
65
66
67
68
69
70
71
72
73
74
75
76
77
78
79
80
81
82
83
84
85
86
87
88
89
90
91
92
93
94
95
96
97
98
99
100
101
102
103
104
105
106
107
108
109
110
111
112
113
114
115
116
117
118
119
120
121
122
123
124
125
126
/* popstate 和 hashchangeevent用于监听路由变化的底层方法 */
const PopStateEvent = 'popstate';
const HashChangeEvent = 'hashchange';

/*这里简化了createBrowserHistory,列出了几个核心api极其作用*/
function createBrowserHistory() {
/*全局history*/
const globalHistory = window.history;
/*处理路由转换,记录listens信息*/
const transitionManager = createTransitionManage();
/*
---------------------------------------------------------------------------------------------------------------
(1)setState: 统一每个transitionManager管理的listener路由状态已经更新
---------------------------------------------------------------------------------------------------------------
*/
/*改变location对象,通知组件更新*/
const setState = (nextState) => {
/*合并信息*/
Object.assign(history, nextState);
history.length = globalHistory.length;
/*通知每一个listens路由已经发生了变化*/
transitionManager.notifyListeners(
history.location,
history.action,
);
};

/*
---------------------------------------------------------------------------------------------------------------
(4)handlePopState: 判断action类型为pop然后setState,从而新加载组件
---------------------------------------------------------------------------------------------------------------
*/
/*处理当path改变后,处理popstate变化的回调函数*/
const handlePopState = (event) => {
/* 获取当前location对象 */
const location = getDOMLocation(event.state)
const action = 'POP'

transitionManager.confirmTransitionTo(location, action, getUserConfirmation, (ok) => {
if (ok) {
setState({ action, location })
} else {
revertPop(location)
}
})
};

/*
---------------------------------------------------------------------------------------------------------------
(3)push:
流程:
1. 生成一个最新的location对象
2. 通过window.history.pushState方法改变浏览器当前路由(当前path)
3. 通过setState方法通知react-router更新,并传递当前的location对象
(由于这次url变化是由history.pushState产生的,并不会触发popState方法,所以需要手动setState,触发组件更新)
---------------------------------------------------------------------------------------------------------------
*/

/*history.push方法,改变路由,通过全局对象history.pushState改变url,通知router触发更新,替换组件*/
const push = (path, state) => {
const action = 'PUSH';
/* 1. 创建location对象 */
const loaction = createLocation(path, state, createKey(), history.location);
/* 确定是否能进行路由跳转,还在确认的时候又开始了另一个转变,可能会造成异常 */
transitionManager.confirmTransition(location, action, getUserConfirmation, (ok) => {
if (!ok) {
return;
};
const href = createHref(location)
const { key, state } = location
if (canUseHistory) {
/* 改变 url */
globalHistory.pushState({ key, state }, null, href)
if (forceRefresh) {
window.location.href = href
} else {
/* 改变 react-router location对象, 创建更新环境 */
setState({ action, location })
}
} else {
window.location.href = href
}
});
};


/*
---------------------------------------------------------------------------------------------------------------
(2)listen:
---------------------------------------------------------------------------------------------------------------
*/
/*底层应用事件监听器,监听popstate事件*/
const listen = (listener) => {
/*添加listen*/
const unlisten = transitionManager.appendListener(listener);
checkDOMListeners(1);

return () => {
checkDOMListeners(-1);
unlisten();
};
};

/*定义checkDOMListeners*/
const checkDOMListeners = (delta) => {
listenerCount += delta;
if (listenerCount === 1) {
addEventListener(window, PopStateEvent, handlePopState);
if (needsHashChangeListener) addEventListener(window, HashChangeEvent, handleHashChange)
} else if (listenerCount === 0) {
removeEventListener(window, PopStateEvent, handlePopState);
if (needsHashChangeListener) removeEventListener(window, HashChangeEvent, handleHashChange)
};
};
/*
listen本质上是通过checkDOMListeners的参数-1或者1来绑定或者解绑popstate事件,
当路由发生变化的时候,调用处理函数handlePopState
*/


return {
push,
listen,
/*...*/
};
};

createHashHistory

监听哈希路由变化

hashchange监听

1
2
3
4
5
6
7
8
9
const HashChangeEvent = 'hashchange'
const checkDOMListeners = (delta) => {
listenerCount += delta
if (listenerCount === 1) {
addEventListener(window, HashChangeEvent, handleHashChange)
} else if (listenerCount === 0) {
removeEventListener(window, HashChangeEvent, handleHashChange)
}
}

改变哈希路由

history.push底层调用了window.location.href改变路由

history.replace底层调用了window.location.replace改变路由

1
2
3
4
5
6
7
8
9
10
11
12
/* 对应 push 方法 */
const pushHashPath = (path) =>
window.location.hash = path

/* 对应replace方法 */
const replaceHashPath = (path) => {
const hashIndex = window.location.href.indexOf('#')

window.location.replace(
window.location.href.slice(0, hashIndex >= 0 ? hashIndex : 0) + '#' + path
)
}

总结

avatar

核心api

Router :接收location变化,派发更新流

router的作用是把history location等路由信息传递下去

1
2
3
4
5
6
7
8
9
10
11
12
13
14
15
16
17
18
19
20
21
22
23
24
25
26
27
28
29
30
31
32
33
34
35
36
37
38
39
40
41
42
43
44
45
46
47
48
49
50
51
52
53
54
55
56
/* Router 作用是把 history location 等路由信息 传递下去  */
class Router extends React.Component {
static computeRootMatch(pathname) {
return { path: '/', url: '/', params: {}, isExact: pathname === '/' };
}
constructor(props) {
super(props);
this.state = {
location: props.history.location
};
//记录pending位置
//如果存在任何<Redirect>,则在构造函数中进行更改
//在初始渲染时。如果有,它们将在
//在子组件身上激活,我们可能会
//在安装<Router>之前获取一个新位置。
this._isMounted = false;
this._pendingLocation = null;
/* 此时的history,是history创建的history对象 */
if (!props.staticContext) {
/* 这里判断 componentDidMount 和 history.listen 执行顺序 然后把 location复制 ,防止组件重新渲染 */
this.unlisten = props.history.listen(location => {
/* 创建监听者 */
if (this._isMounted) {

this.setState({ location });
} else {
this._pendingLocation = location;
}
});
}
}
componentDidMount() {
this._isMounted = true;
if (this._pendingLocation) {
this.setState({ location: this._pendingLocation });
}
}
componentWillUnmount() {
/* 解除监听 */
if (this.unlisten) this.unlisten();
}
render() {
return (
/* 这里可以理解 react.createContext 创建一个 context上下文 ,保存router基本信息。children */
<RouterContext.Provider
children={this.props.children || null}
value={{
history: this.props.history,
location: this.state.location,
match: Router.computeRootMatch(this.state.location.pathname),
staticContext: this.props.staticContext
}}
/>
);
}
}

总结:

初始化绑定listen, 路由变化,通知改变 location,改变组件。 react的history路由状态是保存在 React.Content上下文之间, 状态更新。

一个项目应该有一个根 Router , 来产生切换路由组件之前的更新作用。如果存在多个 Router会造成,会造成切换路由,页面不更新的情况。

Switch: 匹配正确的唯一的路由

1
2
3
4
5
6
7
8
9
10
11
12
13
14
15
16
17
18
19
20
21
22
23
24
25
26
27
28
29
30
31
32
33
34

/* switch组件 */
class Switch extends React.Component {
render() {
return (
<RouterContext.Consumer>
{/* 含有 history location 对象的 context */}
{context => {
invariant(context, 'You should not use <Switch> outside a <Router>');
const location = this.props.location || context.location;
let element, match;
//我们使用React.Children.forEach而不是React.Children.toArray().find()
//这里是因为toArray向所有子元素添加了键,我们不希望
//为呈现相同的两个<Route>s触发卸载/重新装载
//组件位于不同的URL。
//这里只需然第一个 含有 match === null 的组件
React.Children.forEach(this.props.children, child => {
if (match == null && React.isValidElement(child)) {
element = child;
// 子组件 也就是 获取 Route中的 path 或者 rediect 的 from
const path = child.props.path || child.props.from;
match = path
? matchPath(location.pathname, { ...child.props, path })
: context.match;
}
});
return match
? React.cloneElement(element, { location, computedMatch: match })
: null;
}}
</RouterContext.Consumer>
);
}
}
1
2
3
4
5
6
7
8
9
10
11
12
13
14
15
16
17
18
19
20
21
22
23
24
25
26
27
28
29
30
31
32
33
34
35
36
37
38
function matchPath(pathname, options = {}) {
if (typeof options === "string" || Array.isArray(options)) {
options = { path: options };
}

const { path, exact = false, strict = false, sensitive = false } = options;

const paths = [].concat(path);

return paths.reduce((matched, path) => {
if (!path && path !== "") return null;
if (matched) return matched;

const { regexp, keys } = compilePath(path, {
end: exact,
strict,
sensitive
});
const match = regexp.exec(pathname);
/* 匹配不成功,返回null */
if (!match) return null;

const [url, ...values] = match;
const isExact = pathname === url;

if (exact && !isExact) return null;

return {
path, // the path used to match
url: path === "/" && url === "" ? "/" : url, // the matched portion of the URL
isExact, // whether or not we matched exactly
params: keys.reduce((memo, key, index) => {
memo[key.name] = values[index];
return memo;
}, {})
};
}, null);
}

Route:组件页面承载容器

1
2
3
4
5
6
7
8
9
10
11
12
13
14
15
16
17
18
19
20
21
22
23
24
25
26
27
28
29
30
31
32
33
34
35
36
37
38
39
40
41
42
43
44
45
46
47
48
49
50
/**
* The public API for matching a single path and rendering.
*/
class Route extends React.Component {
render() {
return (
<RouterContext.Consumer>
{context => {
/* router / route 会给予警告警告 */
invariant(context, "You should not use <Route> outside a <Router>");
// computedMatch 为 经过 swich处理后的 path
const location = this.props.location || context.location;
const match = this.props.computedMatch
? this.props.computedMatch // <Switch> already computed the match for us
: this.props.path
? matchPath(location.pathname, this.props)
: context.match;
const props = { ...context, location, match };
let { children, component, render } = this.props;

if (Array.isArray(children) && children.length === 0) {
children = null;
}

return (
<RouterContext.Provider value={props}>
{props.match
? children
? typeof children === "function"
? __DEV__
? evalChildrenDev(children, props, this.props.path)
: children(props)
: children
: component
? React.createElement(component, props)
: render
? render(props)
: null
: typeof children === "function"
? __DEV__
? evalChildrenDev(children, props, this.props.path)
: children(props)
: null}
</RouterContext.Provider>
);
}}
</RouterContext.Consumer>
);
}
}

Redirect:重定向

  1. 初始化页面跳转
  2. 组件更新的时候location不相等
1
2
3
4
5
6
7
8
9
10
11
12
13
14
15
16
17
18
19
20
21
22
23
24
25
26
27
28
29
30
31
32
33
34
35
36
37
38
39
40
41
42
function Redirect({ computedMatch, to, push = false }) {
return (
<RouterContext.Consumer>
{context => {
const { history, staticContext } = context;
/* method就是路由跳转方法。 */
const method = push ? history.push : history.replace;
/* 找到符合match的location ,格式化location */
const location = createLocation(
computedMatch
? typeof to === 'string'
? generatePath(to, computedMatch.params)
: {
...to,
pathname: generatePath(to.pathname, computedMatch.params)
}
: to
)
/* 初始化的时候进行路由跳转,当初始化的时候,mounted执行push方法,当组件更新的时候,如果location不相等。同样会执行history方法重定向 */
return (
<Lifecycle
onMount={() => {
method(location);
}}
onUpdate={(self, prevProps) => {
const prevLocation = createLocation(prevProps.to);
if (
!locationsAreEqual(prevLocation, {
...location,
key: prevLocation.key
})
) {
method(location);
}
}}
to={to}
/>
);
}}
</RouterContext.Consumer>
);
};

总结

  1. history提供了核心api,如监听路由,更改路由的方法,已经保存路由状态state
  2. react-router提供路由渲染组件,路由唯一性匹配组件,重定向组件等功能组件

流程分析:

1. 当地址栏改变url,组件的更新渲染都经历了什么?

拿history模式做参考。当url改变,首先触发histoy,调用事件监听 popstate事件, 触发回调函数 handlePopState,触发history下面的 setstate方法,产生新的location对象,然后通知Router组件更新 location并通过context上下文传递,switch通过传递的更新流,匹配出符合的Route组件渲染,最后有 Route组件取出 context内容,传递给渲染页面,渲染更新

2.当我们调用 history.push方法,切换路由,组件的更新渲染又都经历了什么呢?

当我们调用 history.push方法,首先调用history的 push方法,通过 history.pushState来改变当前 url,接下来触发history下面的 setState方法,接下来的步骤就和上面一模一样了

各个路由组件之间的关系
avatar

准备工作

典型的数结构

1
2
3
4
5
6
7
8
9
10
11
12
13
14
15
16
17
18
19
20
21
22
23
24
25
26
27
28
29
30
31
const treeData = [
{
id: 'p1',
title: '浙江',
children: [
{
id: 'p1-1',
title: '杭州',
children: [],
}, {
id: 'p1-2',
title: '绍兴',
children: [],
}
],
}, {
id: 'p2',
title: '江苏',
children: [
{
id: 'p2-1',
title: '南京',
children: [],
}, {
id: 'p2-2',
title: '苏州',
children: [],
}
],
}
]

平铺list结构

1
2
3
4
5
6
7
8
const listData = [
{id: 'p1', title: '浙江'},
{id: 'p2', title: '江苏'},
{id: 'p1-1', pid:'p1', title: '杭州'},
{id: 'p1-2', pid:'p1', title: '绍兴'},
{id: 'p2-1', pid:'p2', title: '南京'},
{id: 'p2-2', pid:'p2', title: '苏州'},
];

List转Tree

递归

1
2
3
4
5
6
7
8
9
10
11
12
13
14
15
16
17
18
19
function list2tree(listData) {
let treeData = [];
for (const node of listData) {
if (!node.pid) { // 没有pid,说明是父节点
let p = {...node}; // 对象的解构
p.children = getChildren(p.id, listData);
treeData.push(p);
}
}

// 找到子节点
function getChildren(id, listData) {
// 过滤出pid === id的所有结果并且存在数组中,把这个数组作为父节点的children
// 注意:这里不能用find,因为find是返回找到的第一个结果
return listData.filter((item) => item.pid === id)
}

return treeData;
}

双层循环

1
2
3
4
5
6
7
8
9
10
11
12
13
14
function list2tree(listData) {
listData.forEach(child => {
const pid = child.pid
if(pid) {
listData.forEach(parent => {
if(parent.id === pid) {
parent.children = parent.children || []
parent.children.push(child)
}
})
}
})
return listData.filter(n => !n.pid)
}

使用map

1
2
3
4
5
6
7
8
9
10
11
12
13
14
15
16
17
18
19
20
21
22
23
function list2tree(listData) {
const m = new Map(),
treeData = [];

for (let i = 0; i < listData.length; i++) {
m.set(listData[i].id, i); // 把节点的id存入映射
listData[i].children = [];
};

// 再次遍历节点
for (let i = 0; i < listData.length; i++) {
const node = listData[i];

// 如果有父节点
if (node.pid && m.has(node.pid)) {
listData[m.get(node.pid)].children.push(node);
} else { // 如果没有
treeData.push(node);
}
}

return treeData;
}

Tree转List

BFS

1
2
3
4
5
6
7
8
9
10
11
12
13
14
function tree2list(treeData) {
const listData = [];
const queue = [...treeData];

while (queue.length) {
const node = queue.shift(); // 取出节点
const children = node.children; // 取出节点的子节点
if (children) {
queue.push(...children);
}
listData.push(node);
}
return listData;
}

DFS

1
2
3
4
5
6
7
8
9
10
11
12
13
14
15
function tree2list(treeData) {
const listData = [];
const stack = [...treeData];

while (stack.length) {
const node = stack.pop();
const children = node.children;

if (children) {
stack.push(...children);
}
listData.push(node);
}
return listData;
}

参考

list和tree的相互转换

准备工作

虚拟DOM是一种轻量级的JS对象,包含以下属性:

  • tag:标签名
  • attrs:属性,一般有id class name等等
  • children:子节点的标签名属性子节点等…
1
2
3
4
5
6
7
8
9
10
11
12
13
14
15
16
17
18
19
20
21
22
23
24
25
26
27
28
29
30
31
// 虚拟DOM
const vnode = {
tag:'DIV',
attrs: {
id: 'app',
},
children: [
{
tag: 'SPAN',
children: [
{tag: 'A', children: []}
],
},{
tag: 'SPAN',
children: [
{tag: 'A', children: []},
],
}
]
}


// 真实DOM
<div id = 'app'>
<span><a></a></span>
<span>
<a></a>
<a></a>
</span>
</div>

实现思路

  • 获取父节点的tag属性,通过document.createElement生成节点
  • 若有属性,则通过setAttrubite(key, value)添加属性
  • 如有子节点,则遍历子节点,重复步骤1,2
  • 把子节点通过appendChild添加到父节点

注意:最后会遇到节点为文本的情况,则可以通过createTextNode方式转义HTML字符,如果是number,可以先转换成string

JS实现

1
2
3
4
5
6
7
8
9
10
11
12
13
14
15
16
17
18
19
20
21
22
23
24
25
26
27
function myRender(vnode) {
// 如果是number类型
if (typeof vnode === 'number') {
vnode = String(vnode);
}

// 如果是string类型
if (typeof vnode === 'string') {
return document.createTextNode(vnode);
}

// 如果是普通的dom
let dom = document.createElement(vnode.tag);

if (vnode.attrs) {
for (let key of vnode.attrs) {
dom.setAttribute(key, vnode.attrs[key]);
}
}

// 子数组递归
if (vnode.children.length) {
vnode.children((child) => dom.appendChild(myRender(child)));
}

return dom;
}

灵魂拷问:类数组转数组的方式你知道多少呢?

方式1: Array.prototype.slice()

1
2
3
4
5
6
7
8
9
10
11
12
13
14
function arrayLike2Array(arrayLike) {
return Array.prototype.slice.call(arrayLike);
}

// test
const arrayLike = {
'0': 'Katrina',
'1': 'Jack',
'2': 'Kate',
'3': 'Jenny',
length: 4
};
const array = arrayLike2Array(arrayLike);
console.log(array); // ['Katrina', 'Jack', 'Kate', 'Jenny']

方式2:Array.from()

1
2
3
4
5
6
7
8
9
10
11
12
13
14
function arrayLike2Array(arrayLike) {
return [...arrayLike];
}

// test
const arrayLike = {
'0': 'Katrina',
'1': 'Jack',
'2': 'Kate',
'3': 'Jenny',
length: 4
};
const array = arrayLike2Array(arrayLike);
console.log(array); // ['Katrina', 'Jack', 'Kate', 'Jenny']

方式3: 拓展运算符

1
2
3
4
5
6
7
8
9
10
11
12
function arrayLike2Array(arrayLike) {
return [...arrayLike];
}

// test
function fn() {
console.log(arguments)
return [...arguments];
}

const array = fn(1,2,3,4,5,6);
console.log(array); // [ 1, 2, 3, 4, 5, 6 ]

需求

手写全选框

设置一个全选框和全不选框以及若干个选择框

要求如下:

  1. 选中全选框或者全不选框:其余若干个选择框都要选中或者不选
  2. 选中若干个选择框全部选中/不选时:全选框和全不选框自动选上

知识储备

  1. 选择框:<input type='checkbox'>
  2. 通过.checked属性判断选择框是否被选择,true为选择,false为不选择
  3. 通过控制xxx.checked = true控制选中,同理通过控制xxx.checked = false控制不选中

实现思路

1. 全选框思路

通过监听全选框的click事件,获取全选框的checked的状态,获取到状态之后,则遍历选择框,将选择框的状态设置为和全选框状态一样

2. 全不选框思路

通过监听全不选框的click事件,获取全不选框的checked的状态,获取到状态之后,则遍历选择框,将选择框的状态设置为和全不选框状态相反

3. 选择框思路

通过对每一个选择框增加click事件,获取checked状态为true的选择框的数量,根据不同的情况处理全选框和全不选框

  • 情况1:数量为0 => 设置全不选框checked属性为true,全选框为false
  • 情况2:数量不为0
    • 数量等于选择框数量 => 设置全不选框checked属性为false,全选框为true
    • 数量不等于选择框数量 => 设置全不选框checked属性为false,全选框为false

4. 细节处理

全选和全不选永远是互斥的

所以在对全不选和全选框事件监听的时候,不仅仅要改变选择框的状态,也要改变对方的状态

JS原生实现

1
2
3
4
5
6
7
8
9
10
11
12
13
14
15
16
17
18
19
20
21
22
23
24
25
26
27
28
29
30
31
32
33
34
35
36
37
38
39
40
41
42
43
44
45
46
47
48
49
50
51
52
53
54
55
56
57
58
59
60
61
62
63
64
65
66
67
68
69
70
71
72
73
74
75
76
77
78
79
80
81
82
83
84
85
86
87
88
89
90
<!DOCTYPE html>
<html lang="en">
<head>
<meta charset="UTF-8">
<meta http-equiv="X-UA-Compatible" content="IE=edge">
<meta name="viewport" content="width=device-width, initial-scale=1.0">
<title>Document</title>
</head>
<input type="checkbox" class="checkedAll">全选
<input type="checkbox" class="unCheckedAll">全不选
<br/>
<hr/>
<input type="checkbox" class="check">选择1
<br/>
<input type="checkbox" class="check">选择2
<br/>
<input type="checkbox" class="check">选择3
<br/>
<input type="checkbox" class="check">选择4
<br/>
<input type="checkbox" class="check">选择5
<br/>
<input type="checkbox" class="check">选择6
<script>
// 获取全选框,全不选框,选择框
const selectAll = document.querySelector('.checkedAll');
const unSelectAll = document.querySelector('.unCheckedAll');
const checks = document.querySelectorAll('.check');


// 全选方法
/*
实现思路:
通过监听全选框的checked状态,一次遍历选择框,将它们的checked状态设置为和全选框一样的状态
*/
selectAll.addEventListener('click', function() {
let selectAllState = selectAll.checked;

// 细节处理:全选和全不选永远是互斥的
unSelectAll.checked = !selectAllState;

// 对选择框进行处理
checks.forEach((item, index) => {
item.checked = selectAllState;
})
})

// 全不选方法
/*
实现思路:
与全选框一样,只是状态设置的时候取反即可
*/

unSelectAll.addEventListener('click', function() {
let unSelectAllState = unSelectAll.checked;

// 细节处理:全选和全不选永远是互斥的
selectAll.checked = !unSelectAllState;

// 对选择框进行处理
checks.forEach((item, index) => {
item.checked = !unSelectAllState;
})
})


// 反选方法
for (let i = 0; i < checks.length; i++) {
// 对每一个选择框都要进行监听
checks[i].addEventListener('click', function() {
// 统计此时选中选择框的个数
let checkCount = document.querySelectorAll('.check:checked').length;
// console.log('checkCount',checkCount);
// 不同的情况进行判断
if (checkCount) {
unSelectAll.checked = false;
if (checkCount === checks.length) {
selectAll.checked = true;
} else {
selectAll.checked = false;
}
} else {
selectAll.checked = false;
unSelectAll.checked = true;
}
})
}
</script>
</body>
</html>

实现效果

全选 全不选
选择1
选择2
选择3
选择4
选择5
选择6

前情提要

突()发()奇()想()想基于AJAX封装、axios、fetch实现同一种效果

我想实现的效果很简单:基于URL返回数据并且动态渲染在页面上

在此感谢,Github某老哥提供的接口:https://github.com/Binaryify/NeteaseCloudMusicApi

准备工作

  • BASE_URL:'http://localhost:3000'
  • 接口文档:'/artist/top/song?id=' + id ,示例为'/artist/top/song?id=6452'
  • data数据结构如下:
1
2
3
4
5
6
7
8
9
10
// mock
const data = [
{name: xxx, xxx: xxx, ...},
...
]
  • 动态渲染函数
1
2
3
4
5
6
7
8
9
10
11
12
13
14
15
function getList(data) {
for (let i = 0; i < data.length; i++) {
// 获取ul
const ul = document.getElementsByTagName('ul')[0];
// 动态渲染数据
data.forEach((item) => {
// 创建li节点
let li = document.createElement('li');
// 给li添加文本内容
li.innerHTML = item.name; // 我只想渲染name
// 把li添加到ul下作为子节点
ul.appendChild(li);
});
}
}

方式1:基于Promise封装的AJAX

1
2
3
4
5
6
7
8
9
10
11
12
13
14
15
16
17
18
19
20
21
22
23
24
25
26
27
28
29
30
31
32
33
34
35
36
37
38
39
40
41
42
43
44
45
46
47
48
49
50
51
52
53
54
55
56
57
58
59
60
61
62
63
64
65
66
67
68
69
70
71
72
73
74
75
76
77
78
79
80
81
<!doctype html>
<html lang="en">
<head>
<meta charset="UTF-8">
<meta name="viewport" content="width=device-width, user-scalable=no, initial-scale=1.0, maximum-scale=1.0, minimum-scale=1.0">
<meta http-equiv="X-UA-Compatible" content="ie=edge">
<title>axios</title>
<link crossorigin="anonymous" href="https://cdn.bootcss.com/twitter-bootstrap/3.3.7/css/bootstrap.min.css" rel="stylesheet">
</head>
<style>
</style>
<body>
<div class="container">
<h2 class="page-header">ajax</h2>
<button class="btn btn-primary">发送GET请求</button>
<h3 class="page-header">数据展示</h3>
<ul class = 'list'></ul>
</div>
<script>
// Promise封装AJAX
function myAJAX(method='GET', url='', isAysnc=true, data=null) {
// 新建xhr对象
let xhr = new XMLHttpRequest();

return new Promise((resolve, reject)=> {
// 监听状态变化
xhr.onreadystatechange = function() {
if (xhr.readyState !== 4) return;
if (xhr.readyState === 4) {
if (xhr.status >= 200 && xhr.status < 300 || xhr.status === 304) {
resolve(xhr.responseText);
} else {
reject(xhr.statusText);
}
}
};

// 建立连接
xhr.open(method, url, isAysnc);

// 发送请求
xhr.send(data);
});
}


// 动态渲染函数
function getList(data) {
// console.log('d', data);
// 获取ul
const ul = document.getElementsByTagName('ul')[0];
// 循环输出数据
data.forEach((item, index) => {
// 创建li
let li = document.createElement('li');
// 指定文本内容插入li中
li.innerHTML = item.name;
// 创建的li插入ul中
ul.appendChild(li);
})
}

const BASE_URL = 'http://localhost:3000';

// 需求1:获取热门50首歌曲 id为6452
const hotSongsRequest = (id) => myAJAX('GET', BASE_URL + '/artist/top/song?id=' + id, true, null);

const btns = document.getElementsByTagName('button');

btns[0].addEventListener('click', () => {
let res = hotSongsRequest(6452);
res.then(value => {
let data = JSON.parse(value);
getList(data.songs);
}, err => {
console.log(err);
})
})
</script>
</body>
</html>

方式2:axios

1
2
3
4
5
6
7
8
9
10
11
12
13
14
15
16
17
18
19
20
21
22
23
24
25
26
27
28
29
30
31
32
33
34
35
36
37
38
39
40
41
42
43
44
45
46
47
48
49
50
51
52
53
54
55
56
57
58
<!doctype html>
<html lang="en">
<head>
<meta charset="UTF-8">
<meta name="viewport" content="width=device-width, user-scalable=no, initial-scale=1.0, maximum-scale=1.0, minimum-scale=1.0">
<meta http-equiv="X-UA-Compatible" content="ie=edge">
<title>ajax</title>
<link crossorigin="anonymous" href="https://cdn.bootcss.com/twitter-bootstrap/3.3.7/css/bootstrap.min.css" rel="stylesheet">
<script src="https://cdn.bootcdn.net/ajax/libs/axios/0.26.0/axios.min.js"></script>
</head>
<style>
</style>
<body>
<div class="container">
<h2 class="page-header">axios</h2>
<button class="btn btn-primary">发送GET请求</button>
<h3 class="page-header">数据展示</h3>
<ul class = 'list'></ul>
</div>
<script>
// 动态渲染函数
function getList(data) {
// console.log('d', data);
// 获取ul
const ul = document.getElementsByTagName('ul')[0];
// 循环输出数据
data.forEach((item, index) => {
// 创建li
let li = document.createElement('li');
// 指定文本内容插入li中
li.innerHTML = item.name;
// 创建的li插入ul中
ul.appendChild(li);
})
}

const BASE_URL = 'http://localhost:3000';


// 需求1:获取热门50首歌曲 id为6452
const hotSongsRequest = (id) => {
axios({
method: 'GET',
url: BASE_URL + '/artist/top/song?id=' + id,
}).then(value => {
let data = value.data;
getList(data.songs);
}).catch(err => {
console.log(err);
})
};

const btns = document.getElementsByTagName('button');

btns[0].addEventListener('click', () => hotSongsRequest(6452));
</script>
</body>
</html>

方式3:fetch

1
2
3
4
5
6
7
8
9
10
11
12
13
14
15
16
17
18
19
20
21
22
23
24
25
26
27
28
29
30
31
32
33
34
35
36
37
38
39
40
41
42
43
44
45
46
47
48
49
50
51
52
53
54
55
56
57
58
<!doctype html>
<html lang="en">
<head>
<meta charset="UTF-8">
<meta name="viewport" content="width=device-width, user-scalable=no, initial-scale=1.0, maximum-scale=1.0, minimum-scale=1.0">
<meta http-equiv="X-UA-Compatible" content="ie=edge">
<title>fetch</title>
<link crossorigin="anonymous" href="https://cdn.bootcss.com/twitter-bootstrap/3.3.7/css/bootstrap.min.css" rel="stylesheet">
</head>
<style>
</style>
<body>
<div class="container">
<h2 class="page-header">fetch</h2>
<button class="btn btn-primary">发送GET请求</button>
<h3 class="page-header">数据展示</h3>
<ul class = 'list'></ul>
</div>
<script>
// 动态渲染函数
function getList(data) {
// console.log('d', data);
// 获取ul
const ul = document.getElementsByTagName('ul')[0];
// 循环输出数据
data.forEach((item, index) => {
// 创建li
let li = document.createElement('li');
// 指定文本内容插入li中
li.innerHTML = item.name;
// 创建的li插入ul中
ul.appendChild(li);
})
}

const BASE_URL = 'http://localhost:3000';

// 需求1:获取热门50首歌曲 id为6452
const hotSongsRequest = (id) => {
const url = BASE_URL + '/artist/top/song?id=' + id;
fetch(url).then(response => {
response.json().then(value => {
let data = value.songs;
getList(data);
})
})


};

const btns = document.getElementsByTagName('button');

btns[0].addEventListener('click', () => {
hotSongsRequest(6452);
})
</script>
</body>
</html>

知识补充

网络请求 | AJAX

网络请求 | Fetch_API 基本用法

参考

MDN Fetch API

AJAX Introduction

axios API

AJAX

网络请求 | AJAX

AJAX的全称是:Asynchronous JavaScript AND XML 也就是异步的JavaScript 和 XML

Ajax 是一个技术统称,是一个概念模型,它囊括了很多技术,并不特指某一技术,它很重要的特性之一就是让页面实现局部刷新。

特点:

局部刷新,无需重载整个页面

简单来说,XMLHttpRequest是实现AJAX的一种方式

面试常手撕手写AJXA或者用Promise封装AJAX,秉着孰能生巧的想法,再写一遍~

1
2
3
4
5
6
7
8
9
10
11
12
13
14
15
16
17
function myAJAX(method = 'GET', url, isAsync=true, data=null) {
let xhr = new XMLHttpRequest();

return new Promise((resolve, reject) => {
xhr.onreadystatechange = function() {
if (xhr.readyState === 4) {
if (xhr.status >= 200 && xhr.status < 300 || xhr.status === 304) {
resolve(xhr.responseText);
} else {
reject(xhr.status)
}
}
};
xhr.open(method, url, isAsync);
xhr.send(data);
})
}

fetch

网络请求 | Fetch_API 基本用法

Fetch 是在 ES6 出现的,它使用了 ES6 提出的 promise 对象。它是 XMLHttpRequest 的替代品。

fetch是一个API 它是真实存在的,它是基于promise的

特点

  • 使用promise,不用回调函数
  • 采用模块化设计
  • 通过数据流对数据进行处理,提高网站性能
1
2
3
4
function ajaxFetch(url, options = {}) {
fetch(url, options).then(response => response.text()
.then(data => console.log(data)))
}

axios

axios是一个基于Promise封装的网络请求库,他是基于XHR进行的二次封装

特点:

  • 从浏览器创建XMLHttpRequest
  • 从node.js创建http请求
  • 支持Promise API
  • 拦截请求和响应
  • 转换请求数据和响应数据
  • 取消请求
  • 自动转换JSON数据
  • 客户端支持防御XSRF
1
2
3
4
5
6
7
8
9
// 示例:发送axios请求
axios({
method: 'post',
url: 'xxx',
data: {
xxx:xxx,
xxx:xxx,
}
})

总结

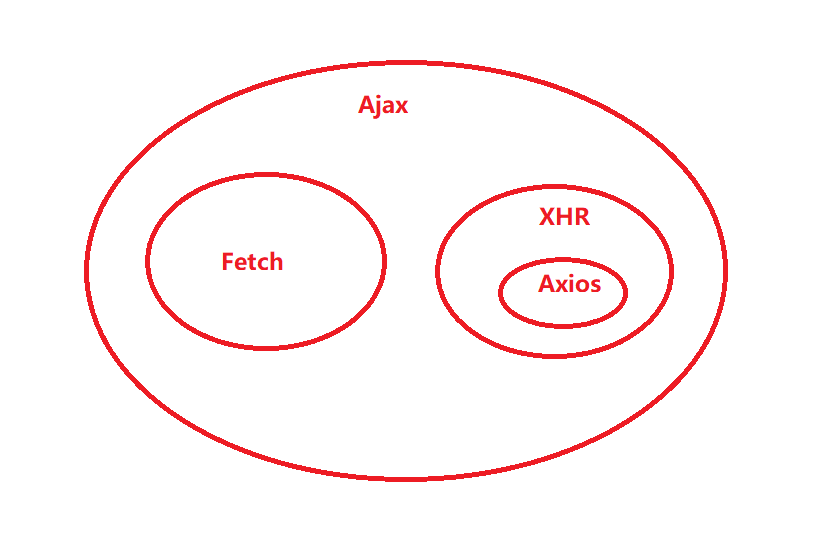
三者的关系如下图所示:

名称 解释
Ajax JS异步的术语,一种技术统称,主要利用XHR(早期api)实现网络请求
Fetch ES6新增的用于网络请求的标准API,基于promise
Axios 一个封装库,基于XHR封装,较为推荐使用

知识补充

网络请求 | AJAX

网络请求 | Fetch_API 基本用法

参考

MDN Fetch API

AJAX Introduction

axios API

Ajax、Fetch、Axios三者有什么区别?

setTimeout() :在指定的毫秒数后调用函数或计算表达式,只执行一次
setInterval() :按照指定的周期(以毫秒计)来调用函数或计算表达式,方法会不停地调用函数,直到 clearInterval() 被调用或窗口被关闭

手写实现

1
2
3
4
5
6
7
8
9
10
11
12
13
14
let timer = null;
function myInterval(cb, delay) {
function fn() {
cb();
timer = setTimeout(() => fn(), delay) // 递归调用
};
timer = setTimeout(() => fn(), delay); // 触发递归
}

// 调用
myInterval(() => console.log('正在打印'), 2000);

// 清除定时器
clearTimeout(timer);